How to create efficiently a schedule to manage a project? Here is a long post to explain how to do that with MSP!
Summary
- TL;DR
- Introduction
- Start from scratch
- Assumptions and inputs
- Create a plan
- Create tasks
- Manage resources
- Manage conflicts
- Still Here? Let’s go deeper!
- Update your plan
- Risks, Slack, Critical Path
- Priorities
- Retro-planning
- Conclusion
1 – Too Long ; Didn’t Read
GANTT VIEW (TASK>GANTT CHART)
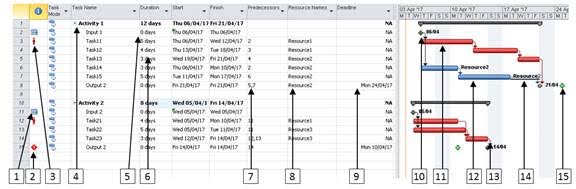
- Task manually scheduled (typically inputs from other functions, clients…) Just insert a start date. Only input deliverables should be manually scheduled. Do not touch “Start” and “Finish” for other tasks (activities, outputs).
- Indicator of deadline conflict (when your forecast (Finish date) is after the required date (Deadline)
- Indicator of resource conflict (when a resource is doing too many things at the same time)
- Summary activity
- Deliverable = “0 days” duration. Could be an input (manually scheduled) or output (with a deadline)
- Activity (Do not go deeper than “Days” to keep the granularity at a manageable level)
- Predecessors (Can be set up with the mouse by dragging it from a predecessor to a successor)
- Resource name (Can be set up and viewed via “Resource>Team Planner”)
- Deadline (PCE required date, client milestone…)
- Deliverable (Its position is given by the “Finish Date”)
- Activity (Red = “on the critical path”)
- Activity (Blue = “not on the critical path”)
- Link. Every activities and milestone should be linked to something linked to a deliverable.
- Slack for task not on the critical path (can be quantified with the column “Total Slack”
- Indicator of deadline.
RESOURCE VIEW VIEW (RESOURCE>TEAM PLANER)
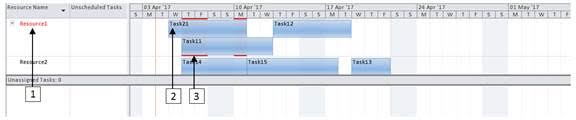
- Resource name (double click it to set up Working Time, Holidays…)
- Task name with same duration as in Gantt view
- Red = Task overlapping with another. This could be fixed by Levelling the resource
2 – Introduction
Microsoft Project. In the Project Management areas, knowledge of this tool is required on almost every profiles, and a lot of big projects are planned with it. MSP is intuitive and at the same time can be very powerful (Earn Value Management, planning optimization, resource leveling, links to Cost Management, to Scope management, to Outlook, Risks, Slack and Critical Path, Network Diagrams, VBA…)
However, from what I have seen for now, this tool is most of the time used in the wrong way. In fact, most project managers come from a technical background, and have never had any training, nor on MSP, nor on scheduling principles in general. So we can often see some random succession of tasks manually scheduled, with (or not) dependencies, and without any resource management.
Thus this article, which aims to provide some guidelines to any project manager (beginner or not) to build and maintain a useful, easy to manage, and not too time-consuming working plan. The tool used will be obviously MS Project, but keep in mind that other alternatives exist (Those will be discussed in another post).
Scope: Such plan aims to support a team of 2 to 20 people, for a rolling planning with a window of 1 to 2 months. Of course your project can be much longer, but this tool will enable you to have a clear view of the first month only. However it is designed to evolve with your project advancement, and be more and more precise when deadlines will approach.
This tool is not made to track hours and micromanage a team, but just to organize the different works, targets and priorities, while taking into account the resource constraints, and inputs from other stakeholders.
3 – Start from scratch
Assumptions and inputs
This document assumes that you have:
- Access to MS Project (at least 2007),
- Information about deliverables and priorities,
- Information about your team (Specialties, holidays, working days and hours…),
- Information about scopes (What needs to be done, how long such activity usually takes),
- Enough time and motivation to read this post, and implement its ideas.
Creating a plan
To start your plan, first thing is to open MS Project. You should have this view:
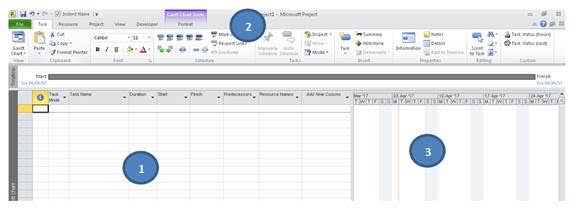
To present you the typical MSP view:
- This is the main work area, where you will be able to insert and modify tasks.
- Those are all the tools to be used for planning. The 3 main tabs will be:
- Tasks, where you are currently, to view the Gantt chart, and modify your tasks.
- Resources, where you will be able to view your teams loads with “Team planner” and to level your resources
- Project, mainly to update your projects with actuals
- View to change the views, but also to play with filters
- The Gantt view to see a graphical representation of the task, and to build links
Creating tasks
Let’s create our first task: just type something in a blank cell of the column “Task Name”:![]()
You can see that several fields have got now values per default, and that a small task is appearing in the Gantt view. Now you can input the duration of the task. Don’t try to micro manage, an activity should be at least 1 day long. If you want to insert a deliverable, set up the date to 0.
For the Start/Finish columns, there are some things to know:
- For activities, you should *Not* use those fields, they will be updated automatically by MS Project with all the constraints.
- For deliverables, if it is:
- An input: you can set up the Start
- An output: (for example a deliverable to the PCE), you should *Not* use those fields, they will be updated automatically by MS Project with all the constraints. However, if you have a “Required date” from your customer, you can use the field “Deadline” (To insert the column, click on “Add New Column” and start typing “Deadline”), the deadline will be seen as a green arrow on the Gantt view
Tasks usually have dependencies to inputs or outputs. To set up Predecessors, the simplest is to link the activities is in the Gantt view, by click and drag from the predecessors to the successors. (You will then see the ID of the predecessor appear in the column “Predecessors”, as well as a little arrow from one task to the other. Finally, the successor will be postponed to the end of the predecessor task.
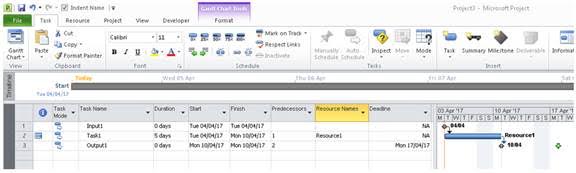
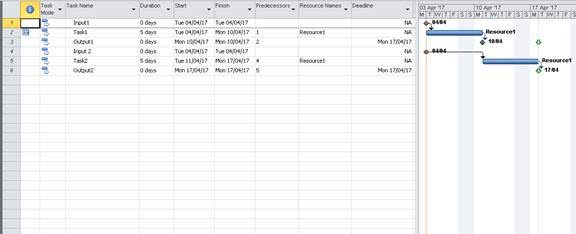
Here is a simple example with the concepts explained above:

Task 1 needs Input1 to start, and will take 5 days to complete. Once this is done, the Output1 will be ready, and we can say visually that this will be on time because its deadline is later than the forecasted (Finish) date.
Manage resources, the Team Planner view
Note: unfortunately, this function is only available in the “Professional” version of MS Project 2010, and not in the “Standard” version. To check your version, click on “File>Help”, it should be on the top left corner.
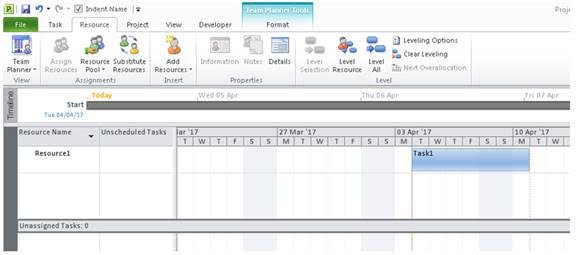
To manage resources, go to the “Resource” tab and click “Team Planner”. You should have the view below:
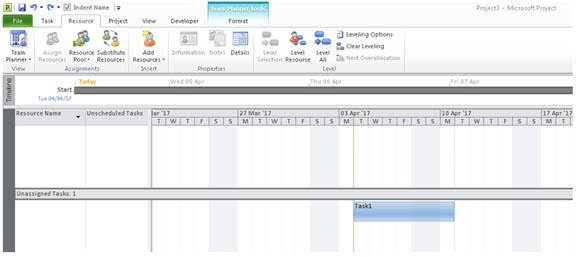
As you can see, our task appears into the “Unassigned Tasks” section. To assign it, we first have to create a new Resource, by clicking “Add Resources>Work Resource”. You can then double click on the resource to change a lot of parameters (Resource name, Working time, Costs, Notes…) For now, just change the Resource name to “Resource1”.
To affect the resource to the task, simply click the task and drag it to the resource:
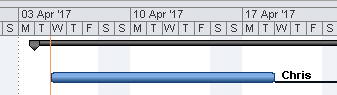
If you come back to the Gantt Chart view (“Task>Gantt Chart”), you will now see that the resource has been added to the task:
Note: To affect resource, you can directly write the name of the resource in the column “Resource Names”, but keep in mind that you may have to input its holidays, and working time later.
Manage conflicts
Deadline conflicts
This is happening when your deadline is before the finish date of the deliverable, note that a little red diamond now appear on the line:

That means that there is a conflict between the requested date (Deadline) and your forecast date (Finish). Action need to be taken, the list below is from the PMP principles:
- Challenging (Reduce task duration to the resources, for the same work)
- Crashing (Adding other resources/costs to do a task faster)
- Fast tracking (Do several activities in parallel instead of sequence)
- Escalating (Show to your boss the risk, its root causes, and ask if the new date is fine for him)
Note: Other more elaborate solutions exists (Start at risk, Subdivide the work, Reduce the scope or the quality…), but that will be discussed in another post!)
Resource conflicts
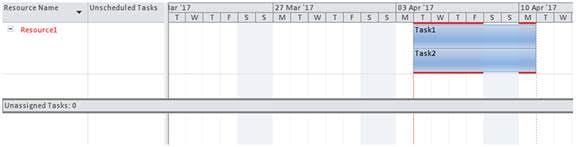
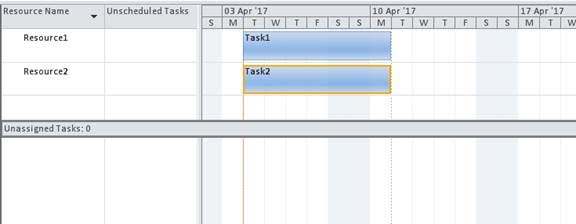
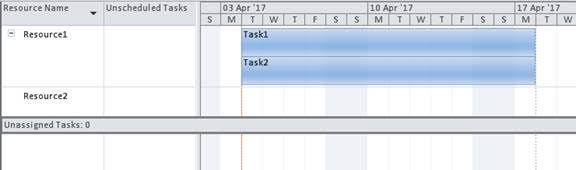
Let’s say you have another task to be done in parallel with the Task1, but by the same Resource1, note that a little red silhouette now appear on the left of each line:

In the “Team Planner” view: You can also see that the resource “Resource1” has 2 Tasks to be done at the same time:
To resolve a resource conflict, you can:
- Level the resource so MS Project will slip the activities to resolve the conflict: Click “Level All” (or “Level Resource” and select “Resource1”): Note that this technique may increase the duration of the tasks, and create conflicts with deadline:
- Give one of the task to another resource (create a new resource, then drag the task from one resource to another)

- [NOT ADVICED] Split your resource so he works 50% of its time on every tasks: In the Gantt Chart view, double click on the task line, go to the “Resource” Widget, and set the units to “50%” for both tasks. Note that this will increase the duration of the tasks:

Note: This solution is *NOT* advised (Lots of mismatch and exceptions could loose you and make your plan unmanageable).
4 – Still here? Let’s go deeper!
Update your plan, Move your tasks
A few days have past since last time you updated you plan. How to update your plan?
First thing to know: the “Current Date” is per default set up to the current date of the system (today). If you want to position yourself as tomorrow, you can change it doing “Project>Project Information” and change the “Current date.
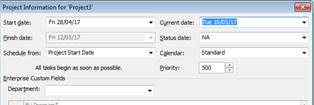
Beware, there could be a difference between the “Current Date” and the “Status date” functionality, found in the “Project” tab. Per default it’s the current date, but you can change it to cover your need (for example if you want to do a status in the future, or at the beginning of the month).
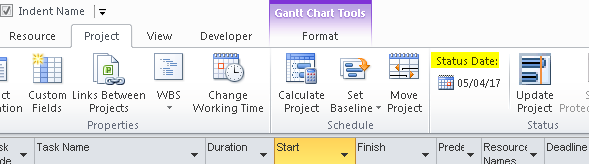
Note: Again, the “Status date” is not the same than the “Current Date” (typically the orange bar on your Gantt chart). The “Current Date” tells the system which date is today whereas the “Status Date” is the date chosen for your reports (it could be 1st day of this month). When you change the “Current Date”, that will automatically change the “Status Date”. If needed you can hide/unhide those bar by right clicking on the Gantt and select ”Gridlines”.
Once the “Current Date” selected, for every task, ask yourself “Has this started or not?”:
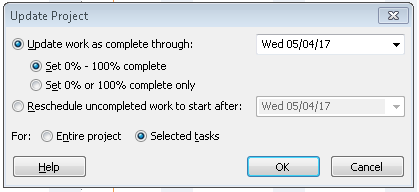
- Started: Select the task(s) you want to update, then go to “Project>Update project”, and set “Update work as complete through: Set 0%-100% complete”, do not forget to select “Selected tasks”:
Another way to go is to use the “Task” tab and click the buttons below: (You can also do that with the mouse by click and dragging the grey bar from the left of your task.)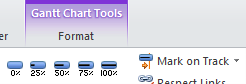
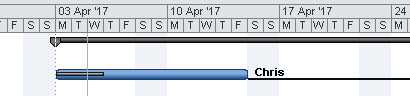
You will notice that a dark grey bar has now appeared in the task: This is just to show you that the work has now started:
- Not started: Select the task(s) you want to update, then go to “Task>Move” and select “Incomplete part to status date”. MSP will move the tasks according to all the rules it has (Resource availabilities, Available slack) and slip the dependent tasks if needed.
Note: This will create a constraint “Start No Earlier Than” for the moved tasks, with this change, you may need to modify your schedule (play with resources and tasks to meet your targets)
Risks
Critical Path, Slack
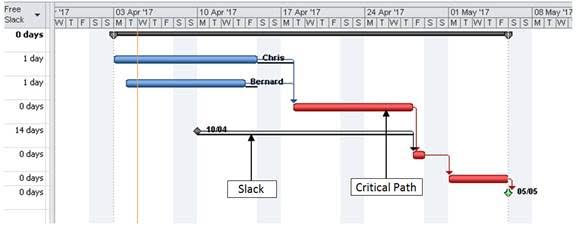
The critical path is the sequence of activities that represents the longest path through a project, which determines the shortest possible project duration.
You can see the critical path on your Gantt chart by selecting “Gantt Chart Tools>Format>Critical Tasks”. The on the critical path will be shown in red.
The Slack is the margin you have on a task, you can view it selecting “Gantt Chart Tools>Format>Slack”. Slacks are shown as black lines. Also, you can insert the column “Free Slack” to have a quantity (before impacting another task), and “Total Slack” (before impacting the project delivery).
Priorities
If needed, you can manage the priorities of your plan to enable MS Project to have a better view of what is needed first. You can insert the column “Priority” where you can input different integer value. By default all the values are 500. A “Higher” priority means a higher number.
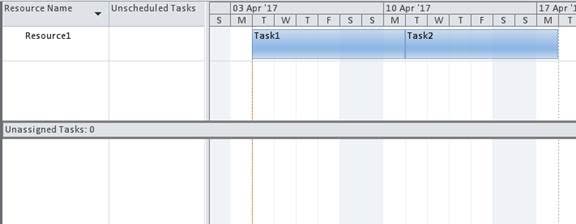
In the example below, if we level our resources without doing anything else, the task 1 will be done before the task 2. (The leveling is done by ID per default)

To work by priority, set up your priorities in your activities (let’s say 400 for task 1 and 600 for task 2), then go to “Resource>Leveling Options” and select “Priority, Standard”. After that, click on “Level All”.
Note: the priorities have to be set up on the tasks, and not on the summary tasks or milestones. The levelling options (Resource>Leveling Options) are really useful to customize the levelling: Do you want to split your tasks if needed? To level everything from scratch or to base the new update on the old values? To level only until a certain day? To level within the slack so the critical path is not impacted? Also, keep in mind that you can level only a group of task or/and resource if you want.
Retro-Planning
When planning, you may want to know when to start a task at the latest to meet a deadline, ie work backward, or to do a “Retro-planning”.
First thing to do is to build up your planning as usual, however, set a “Finish Date” to the Output:

Then, insert the column “Constraint Type”, and set all the activities with the constraint “As Late as possible”:

You have not your “Start not earlier than” date: here the 12/04/2017. The great thing with this method is that you can use links and resource constraints (working time, holidays…) to build your best forecast.
Conclusion
I hope you learnt something with this post 🙂 I prefer to conclude by giving some simple advices to wrap up everything and give you the best direction to go:
- Start low: Plan only 1 task, play with it, then plan another one…
- Do not go to deep. Do not micro manage. (keep 1 day minimum by activity, by default in MSP 1 day = 8h)
- The hard part is not to schedule, but to keep your schedule up to date. You will need to get used to the different ways to update your schedules. Take heart!
- Keep it as a rolling wave planning (focus on a 1 to 2 month windows), add incoming activities regularly.
- Keep 1 resource by activity. If 2 resources are working on the same thing, it is simpler to create 2 lines.
- Use your plan at least 5min a day. Put a reminder in your Outlook agenda if needed.
- Keep tasks titles clear and small
- Don’t try to move an activity manually. Almost all your tasks should be in “Auto schedule” mode and with a constraint type “As soon as possible”. Only exception: Inputs from other stakeholders (Functions, client, PCE…) To check that, watch out for the little indicators as below. To changes, double click the task and go in the “Advanced” Tab.
What was not discussed here
Several topics where purposely ignored in this post to focus on other concepts:
- How to set up a baseline and use “Tracking Gantt” the to track your schedule more precisely.
- How to build more elaborated views, using actual starts, split tasks, estimations, and progress bars.
- Theory about task types (Duration, Work, Units), effort driven tasks, Earn Value Management.
- In-Depth adjustment on Schedules and Resource Schedules (Task constraints, Interim plans, Resource Pools, Resource Contours, Overtime)
Don’t worry, on day that kind of fun will be discussed in other posts 🙂
Usefull Shortcuts
| Shortcut | Function |
| F3 | Remove all filters |
| F2 | Edit the cell |
| Ctrl+F | Find or Replace |
| Insert | Insert a blanck line above the one selected |
Sources:
PMP: https://www.pmi.org/certifications/types/project-management-pmp
Some online courses (old but gold) http://www.ashburytraining.co.uk/Manuals/